Configuring Single Sign On (SSO)
By default, BCMS utilizes a self-contained user and authentication environment. Organizations can choose to leverage their existing SSO solutions for user authentication by taking these additional configuration steps after BCMS has been installed. At this time only Okta and Azure AD SSO solutions are supported.
Contact support to request additional SSO provider enablement in future releases
Enabling Okta SSO support for BCMS
Section titled “Enabling Okta SSO support for BCMS”-
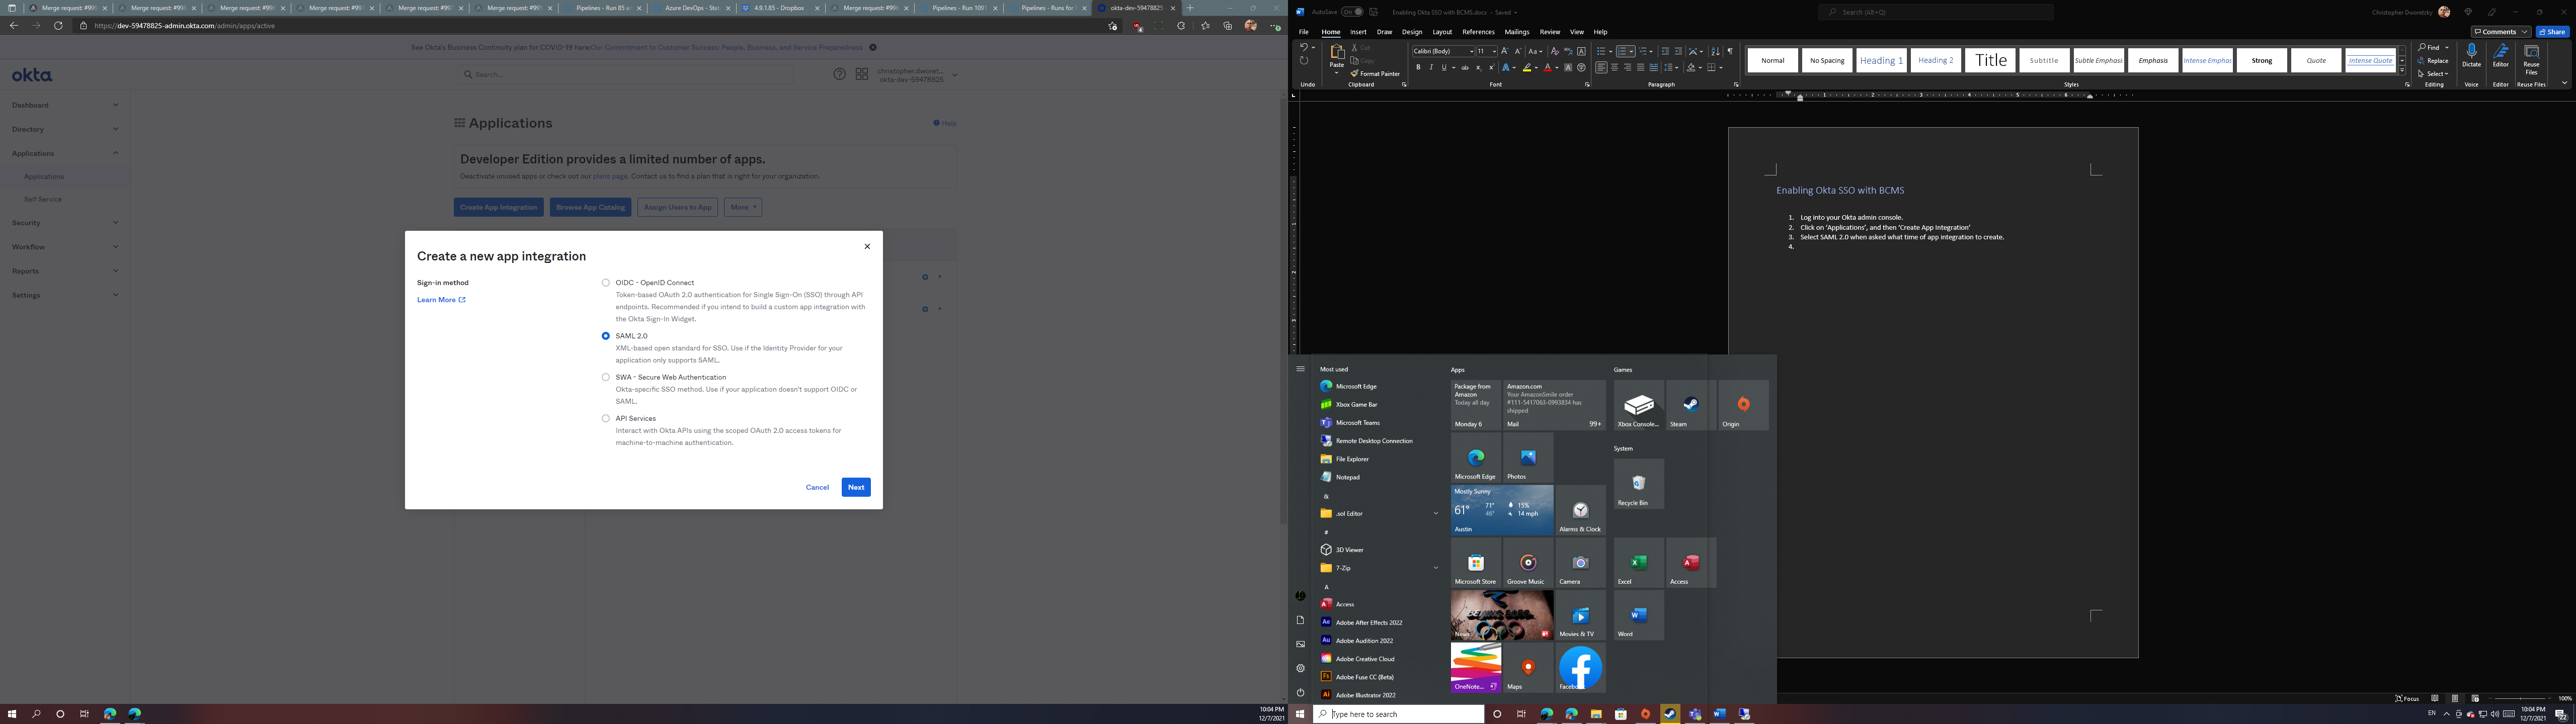
Log into your Okta admin console.
-
Click on ‘Applications’, and then ‘Create App Integration’
-
Under ‘new app integration’ type, select ‘SAML 2.0’ and then click ‘Next.’
- Under ‘App name’, enter ‘Browsium Client Management System,’ and click ‘Next’.
For customers with multiple BCMS environments, use this value field to denote which BCMS server is connected to each integration. You may create one integration per environment.

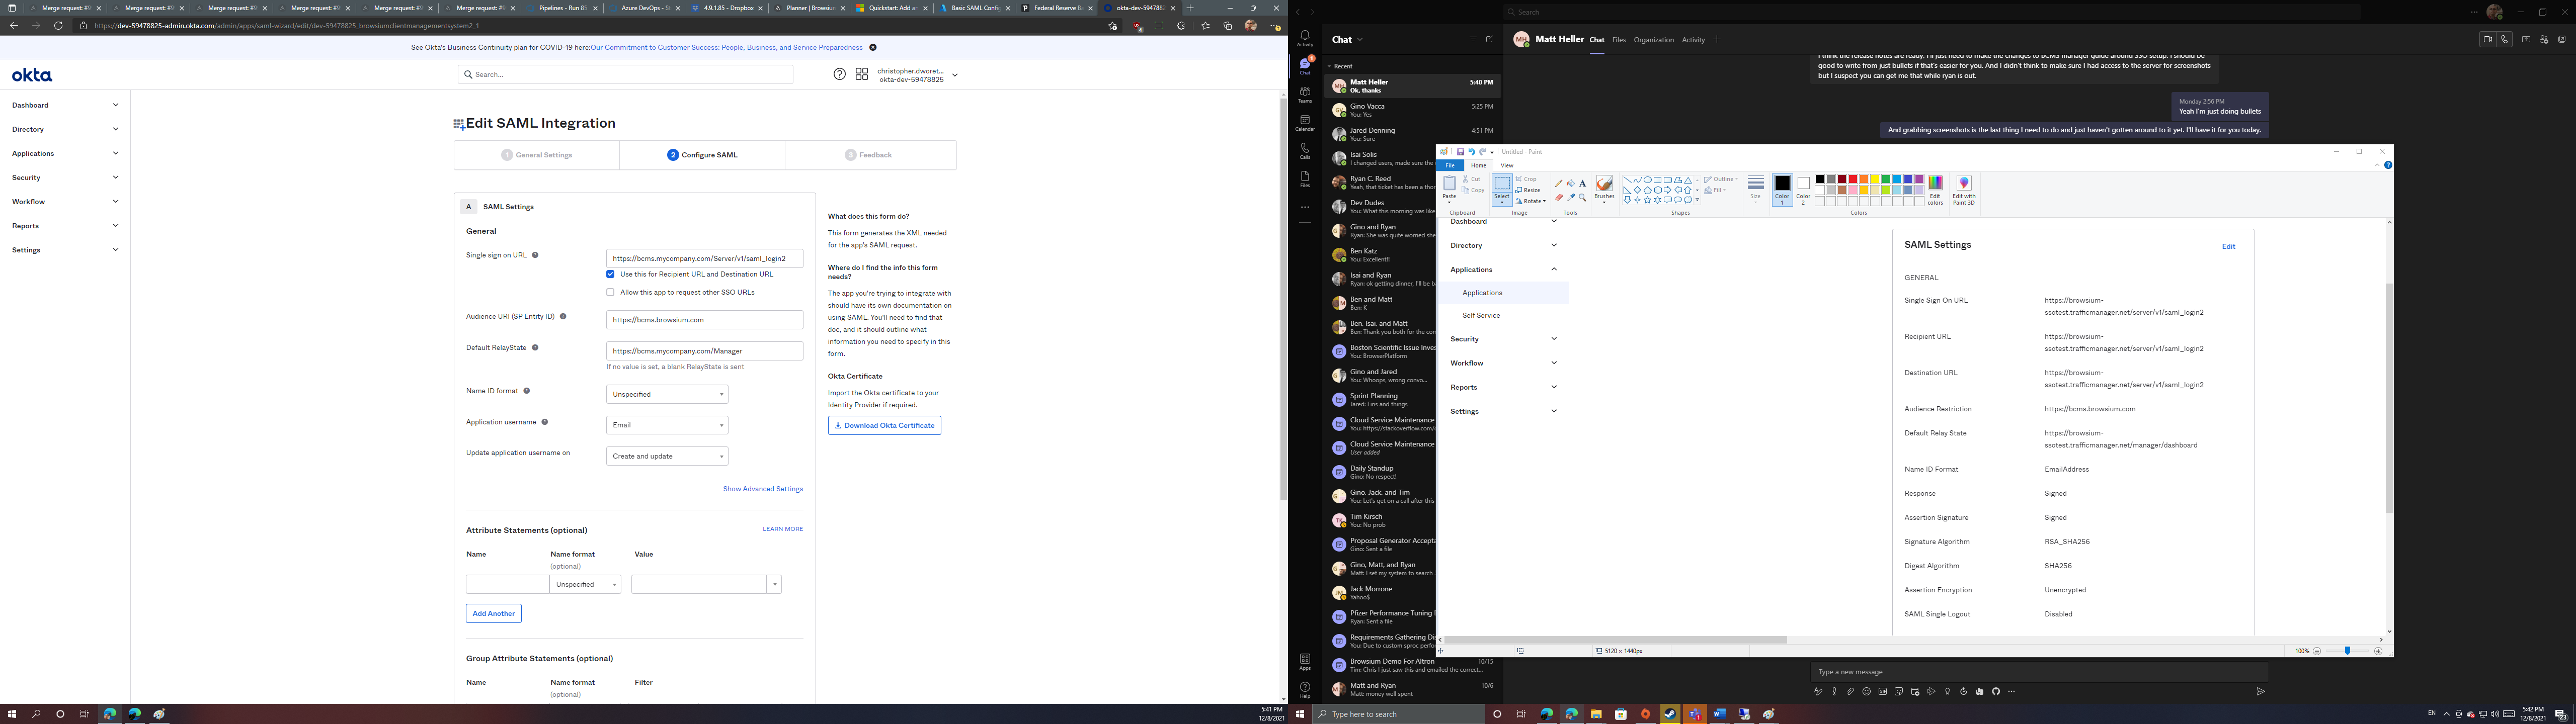
- For the ‘Single sign on URL’ value, enter the full address of the Browsium Client Management Server with ‘/v1/saml_login2’ at the end. The first part must exactly match the address of the server used when logging into BCMS via the Browsium Client Manager. In a load-balanced environment, use the URL of the load balancer.
For example: For a server located at https://bcms.mycompany.com/Server, enter https://bcms.mycompany.com/Server/v1/saml_login2.
-
For ‘Audience URI’, enter ‘https://bcms.browsium.com’.
-
For ‘Default RelayState’, (optional) enter the URL of the Browsium Client Manager used to sign into the Browsium Client Management Server. This value is used when logging into BCMS using Okta apps via the Okta end user dashboard. Without this value, users will only be able to initiate a BCMS login by directly navigating to the Browsium Client Manager itself and attempting to login via the end user dashboard will result in visible error. This url must end in ‘/Manager’.
-
For ‘application username’, select ‘Email.’
-
Leave all other settings on the defaults.
-
Click the ‘Next’ button to continue.
-
On the feedback page, select ‘I’m an Okta customer adding an internal app’ and click the finish button to finalize the integration.
-
With the integration created, click the ‘View Setup Instructions’ button under the ‘Sign On’ tab to display the additional information needed to connect your BCMS instance to Okta.
If your BCMS is managed by a third-party, contact them for assistance to complete the remaining steps.
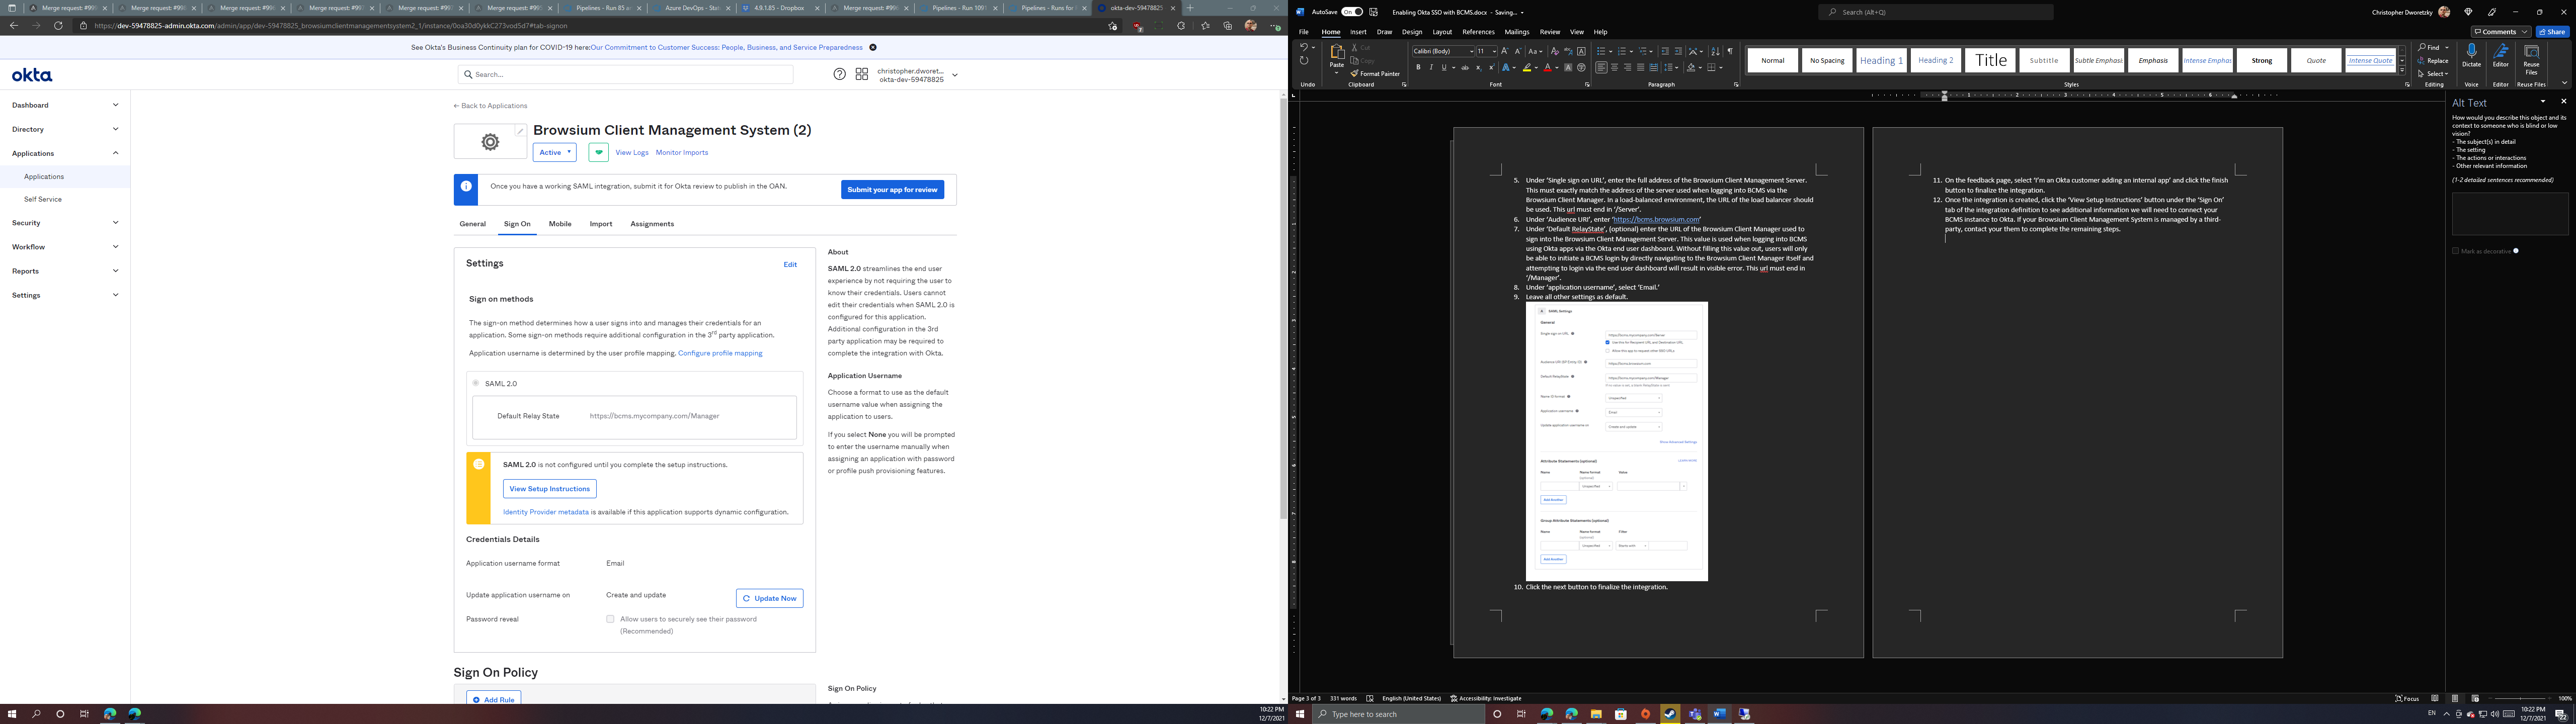
- On the setup instructions page, copy the identity provider single sign-on URL (value marked with #1). It will be needed for later.

-
Click the ‘download certificate’ button (under value marked with #3) to download the certificate that BCMS needs to read SAML traffic from Okta.
-
On your Browsium Client Management Server, navigate to C:\ProgramData\Browsium\Proton. Rename the certificate you downloaded in the previous step to ‘saml_idp_cert.cert’ and copy it into this directory.
The certificate is needed on each BCMS server or machine with the BCMS manager. The certificate it NOT required for client machines that will access the BCMS manager via a browser.
-
Navigate to the Browsium Client Management Server base directory. By default, this is C:\Program Files (x86)\Browsium\Browsium Client Management System\Server\Sites\Server.
-
Edit the Web.config xml file, removing the commenting notations (!—) from the ‘SamlIDPUrl’ value listing near the bottom of the the ‘appSettings’ configuration node. Enter the identity provider single sign-on URL you copied in step 13 as the value property.

Alternatively, the configuration editor built into IIS Manager can be used to add this configuration value.
Note: Web.config is replaced when upgrading to a new version of BCMS. You’ll need to save a copy of your Web.config file (or keep a separate document with the edits you have made) before upgrading and apply your custom settings to the new file. You should not assume that the old Web.config file will work on the new version of BCMS as other aspects of Web.config may have changed to support new features in Proton so Browsium does not recommend replacing the new Web.config file with an older one. Instead, make edits to the new Web.config file to match the old version, ensuring the fields and values are correct.
- To disable local account creation and rely only on SSO logins, change the app setting value of ‘AllowLocalAccountCreation’ from 1 to 0. This will block the ability for users to create new local, non-SSO logins.
Okta and other SSO providers recommend creating at least one local administration account for systems with ‘hybrid’ authentication options in the event the SSO system becomes unavailable so not all users will be locked out.
- Navigate to the Browsium Client Manager, and the new ‘SSO’ tab should now be located on the login page. Click this tab and then click on the ‘Connect’ button to sign in via Okta, supplying the same Browsium Client Management Server URL you would supply for local logins.

Enabling Azure AD support for BCMS
Section titled “Enabling Azure AD support for BCMS”-
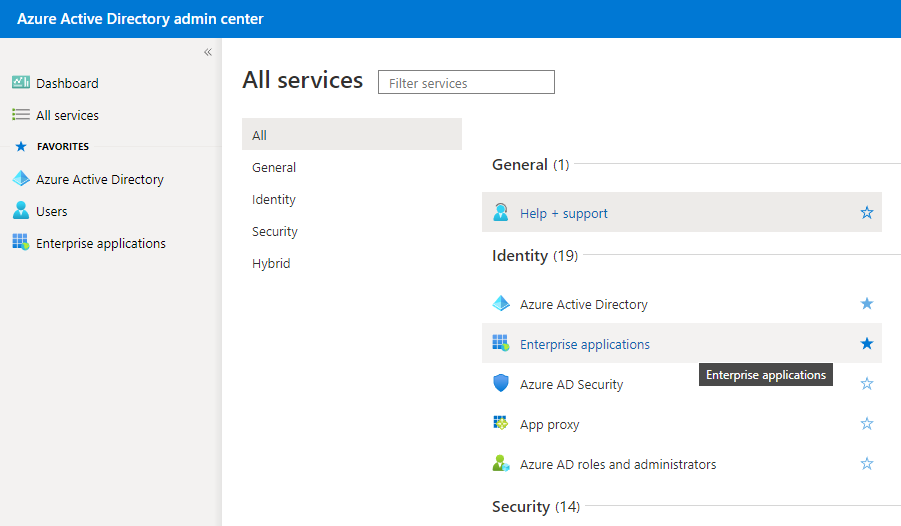
Log into the Azure Active Directory admin center using an Azure AD account with administrator privileges.
-
Select ‘All services’, and then ‘Enterprise applications.’
- In the Enterprise applications control panel, click ‘New application’ to open the Azure AD gallery.

- In the Azure AD gallery, select ‘Create your own application.’

- In the Properties fields, type ‘Browsium Client Management System’ in the Name field.
For customers with multiple BCMS environments, use this value field to denote which BCMS server is connected to each integration. You may create one integration per environment.
-
When prompted ‘What are you looking to do with your application?’ select ‘Integrate any other application you don’t find in the gallery (Non-gallery)’. Click ‘Create’.
-
After Azure AD completes making the application definition, click the ‘Single sign-on’ listing.

-
Select ‘SAML’ as the single sign-on method.
-
In the SAML setup wizard, click the first ‘Edit’ button under Step 1: Basic SAML Configuration.

- Add https://bcms.browsium.com under ‘Identifier (Entity ID)’, then select the ‘Default’ checkbox to make it the default.

- Under ‘Reply URL’, enter the full address of the Browsium Client Management Server with ‘/v1/saml_login2’ at the end. The first part must exactly match the address of the server used when logging into BCMS via the Browsium Client Manager. In a load-balanced environment, use the URL of the load balancer.
For example: For a server located at https://bcms.mycompany.com/Server, enter https://bcms.mycompany.com/Server/v1/saml_login2.
-
For ‘Sign on URL’ and ‘Relay State,’ enter the URL for your instance of the Browsium Client Manager. This url must end in ‘/Manager’.
-
BCMS does not currently support SAML Logout so leave ‘Logout Url’ blank.
-
Click the ‘Save’ button.
If your BCMS is managed by a third-party, contact them for assistance to complete the remaining steps.
-
Click the icon to the right of ‘Login URL’ under ‘Step 4: Set up Browsium Client Management System’ to copy the URL and save it for later.
-
Click the ‘download’ button next to ‘Certificate (Base64)’ under ‘Step 3: SAML Signing Certificate’ to download the certificate required for BCMS to communicate with Azure AD.
-
On your Browsium Client Management Server, navigate to C:\ProgramData\Browsium\Proton. Rename the certificate you downloaded in the previous step to ‘saml_idp_cert.cert’ and copy it into this directory.
The certificate is needed on each BCMS server or machine with the BCMS manager. The certificate it NOT required for client machines that will access the BCMS manager via a browser.
-
Navigate to the Browsium Client Management Server base directory. By default, this is C:\Program Files (x86)\Browsium\Browsium Client Management System\Server\Sites\Server.
-
Edit the Web.config xml file, removing the commenting notations (!—) from the ‘SamlIDPUrl’ value listing near the bottom of the the ‘appSettings’ configuration node. Enter the identity provider single sign-on URL you copied in step 13 as the value property.
Alternatively, the configuration editor built into IIS Manager can be used to add this configuration value.
Note: Web.config is replaced when upgrading to a new version of BCMS. You’ll need to save a copy of your Web.config file (or keep a separate document with the edits you have made) before upgrading and apply your custom settings to the new file. You should not assume that the old Web.config file will work on the new version of BCMS as other aspects of Web.config may have changed to support new features in Proton so Browsium does not recommend replacing the new Web.config file with an older one. Instead, make edits to the new Web.config file to match the old version, ensuring the fields and values are correct.
- To disable local account creation and rely only on SSO logins, change the app setting value of ‘AllowLocalAccountCreation’ from 1 to 0. This will block the ability for users to create new local, non-SSO logins.
Best practice guidance from SSO providers recommends creating at least one local administration account for systems with ‘hybrid’ authentication options in the event the SSO system becomes unavailable so all not users will be locked out.
- Navigate to the Browsium Client Manager, and the new ‘SSO’ tab should now be located on the login page. Click this tab and then click on the ‘Connect’ button to sign in via Okta, supplying the same Browsium Client Management Server URL you would supply for local logins.